Hello all, it´s
Evelyn here today and I want to share my projects, I made with the adorable March Kit "Butterfly Garden". I loved to work with this kit, especially the papers from Blue Fern Studios "Timeless" collection seems to be made for me personal ;-).
For my first layout I used a photo from the Regensburger Dom (Regensburg Cathedral), we visited with a class from our school some years ago. This is a very old and famous cathedral in Germany - and very impressing!
I was inspired by the gorgeous work of
Pascale B., who is a master of scrapping pictures of buildings.
 |
| From my stash: stencil, dies, chipboards, modeling paste, gesso clear, black and white, embossing powders, watercolor pencils, mists and magicals |
|
First I gave the paper a coat of clear gesso, then I started with the background, where I added modeling paste through a brick stencil. After drying I coloured the "wall" with the grey gelato from the kit and detailed it with watercolor pencils in black, purple and lilac. Now followed some stamping and putting the photo in place. I embellished the whole thing with diecut leaves, which I colored, heat embossed chipboards, the metal rings from the kit and the gorgeous flowers, also included in the kit. Finally I sprincled some splashes with black and white gesso and highlighted some of the leaves.
Here are some details:
My next layout is a springery one with a photo of my beloved daughter. The chipboard border is so very beautiful, isn´t it?
 |
| from my stash: ecoline liqut watercolors, gesso clear and white, embossing powders, cardstock leftovers, stencil and gel medium, stamps, ink and dies |
I started again by coating the paper with clear gesso. then I glued scraps of the book pages from the kit and coloured the background with ecoline watercolors, as I did with the diecut flowers. The beautiful chipboard branch and butterflies I heat embossed with different embossing powders. To the middle of the hanging baskets I added diecut flowers and embellished them with pearls from the kit. Gorgeous are also the wooden embellishments!
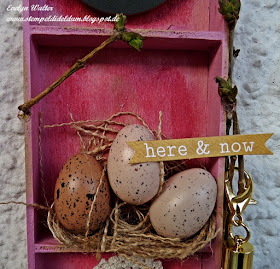
For my next project I used the little trinket box. I decided to make a easter hanging.
 |
| from my stash: little easter eggs, burlap, twigs, acrylic paint |
I painted the box with the paint from the kit - it´s beautiful glimmery! The I added some interest with the Prima Ink Pad "Shabby Tote" from the kit and some acrylic paint from my stash. I decorated the boxes, glued some twigs from my garden and hanged the tazzle beside.
For the next layout I used a photo I found on
flickr. I love Ballerinas!
 |
| from my stash: clear and white gesso, stencils, modeling paste, inks and stamps, threats, mica flakes, gel medium, cloth and cardstock leftover, rub ons |
|
Again I started by painting the page with clear gesso. On the background I used a stencil and modeling paste, painted with the mist from the kit and white gesso. Another stencil I used with distress ink ground espresso and stamped with a script stamp and Archival Ink Potting Soil. I took some curtain cloth from my stash and colored it with the mist from the kit. I dried it with my heat tool and allowed the cloth to melt a bit. The wooden circles from the kit and the chipboard word I colored with the Prima ink pad from the kit and stamped with the same script stamp as I used on the background. I love, how they turned out! Now I put the page together, decorated with some of the half pearls from the kit and mica flakes from a former kit. The pretty flower is fitting perfect to the Tutu of the Ballerina! As a finishing touch I added some golden rub ons from my stash.


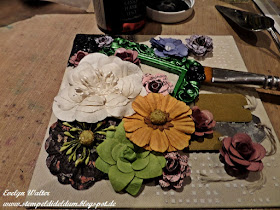
For my last project I used one of the chipboard squares, the metal tags, some flowers and the pretty frame from the kit and made a little Mixed Media project.
 |
| from my stash: self adhesive canvas, stencil and modeling paste, metal key, diecut roses, gesso, mists, inka gold, mica flakes, gel medium, black and white gesso |
This is what I started with. I covered the chipboard with some canvas, added some texture with modeling paste through a stencil and glued all the pretty things in place.
Then I covered everything with black gesso and when dry played with mists and paints. Gesso to highlight some areas and Mica Flakes for a little bling completed my composition.
That´s is from me. I had so much fun with this kit!
I hope you liked my projects.
Thanks for visiting today!
Stay creative!


