Did you see the gate on Beverly's layout in the sketch challenge post? She created a very distressed look and a tutorial so you can see how she achieved this look:

Crackled Paint Tutorial
The look of crackled paint on wood is very simple to achieve with this technique and customizable with any color you desire! In just a few quick and easy steps, you'll have an effect that looks much more difficult than it really is.
The look of crackled paint on wood is very simple to achieve with this technique and customizable with any color you desire! In just a few quick and easy steps, you'll have an effect that looks much more difficult than it really is.
For this
project, I used a dark brown paint for the base and a creamy white for
the top layer.
You might want to practice first on a small piece of
scrap chipboard or paper.
Materials needed:
Chipboard piece
two colors of craft paint, one light and one dark
plain Elmer's glue
a soft paint brush
Materials needed:
Chipboard piece
two colors of craft paint, one light and one dark
plain Elmer's glue
a soft paint brush


Start by brushing on a medium coat of the darker paint onto the
chipboard
and let dry completely. Usually one coat is sufficient.

You can use a brush for the next step, but I simply
smeared on a thick coat of the glue with my finger.

Let the glue dry slightly, but not completely. Some areas will start to
dry and look clear.
This is when I begin to apply the next paint layer.
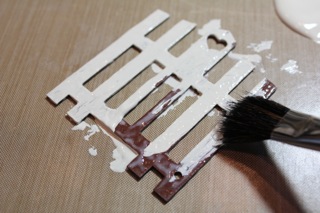
Using a soft brush, load a somewhat heavy amount of paint onto the brush
and apply gently over the glue, not pressing hard, but sort of skimming
the top and floating it on.
Paint in the direction you would like the
cracks to appear, such as length wise for vertical pieces. If you want
thinner, finer cracks, use less paint.

You will start to see cracks appear almost immediately.

Let dry completely. I like to use ink on the edges
just to give it a bit more of an aged look. Experiment with different
amounts of glue and paint.
A thinner layer of the top coat of paint will
produce smaller cracks closer together.
Use different colors to
customize to your project. Have fun with it!
Thank you Beverly for this tutorial. If you use this technique, we hope you will show us your finished product. You can post it in our Gallery or post in the
comment section of this blog post and provide a link to your blog.
I will certainly try this! Thank you Beverley! I use Ranger crackle glaze but this will certainly be cheaper!!
ReplyDelete